A Practical Guide to Servicing Your Car
Author: Toby Date Posted:22 May 2026

Servicing your car doesn’t always mean a trip to the workshop. Many basic maintenance tasks can be done at home with the right tools and a bit of know-how. For everyday drivers, a DIY car service can save a surprising amount of money while also helping you understand your vehicle better.
Labour costs at workshops across Australia often range from $100 to $180 per hour, and even simple services can quickly add up. By handling some routine maintenance yourself, you can keep your car running well while significantly reducing ongoing servicing costs.
Below is a practical guide to common DIY service tasks and where the biggest savings usually come from.
Why DIY Car Servicing Can Save You Money
A large portion of workshop servicing costs comes from labour rather than parts. Many routine tasks only require basic tools and a bit of time.
Typical savings can include:
| Service Task | Workshop Cost | DIY Cost |
|---|---|---|
| Engine oil and filter change | $180–$350 | $60–$120 |
| Air filter replacement | $60–$120 | $20–$50 |
| Cabin filter replacement | $80–$150 | $25–$60 |
| Wiper blade replacement | $40–$90 | $20–$40 |
By doing just a few of these services yourself each year, you could easily save hundreds of dollars annually.
Basic DIY Service Tasks Most Drivers Can Do
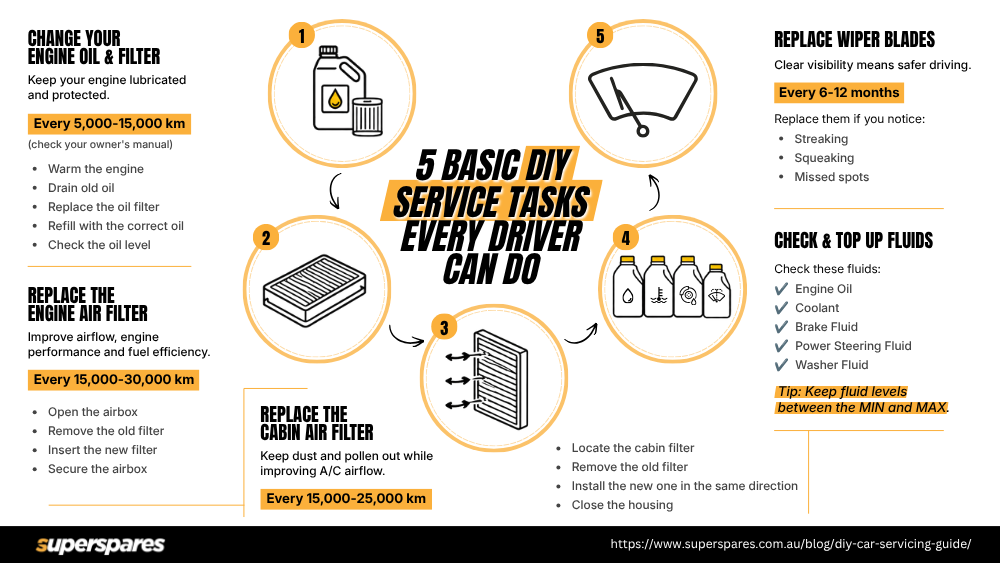
Not every maintenance job requires a mechanic. Many routine checks and replacements are straightforward and safe to perform at home.
1. Engine Oil and Filter Change
Changing your engine oil is one of the most common and cost-effective DIY service tasks. Engine oil lubricates moving parts, reduces friction, and carries away heat and contaminants that build up during normal operation. Over time the oil breaks down and becomes dirty, which is why regular replacement is essential.
Typical interval:
Most vehicles require an oil change every 5,000–15,000 km, depending on the oil type (conventional or synthetic), driving conditions, and manufacturer recommendations.
Steps:
- Warm the engine slightly so the oil flows easily.
- Drain the old oil by removing the sump plug and collecting it in an oil pan.
- Remove and replace the oil filter.
- Reinstall the drain plug and refill the engine with the correct oil grade.
- Start the engine briefly, then check the oil level on the dipstick and top up if needed.
Always dispose of used oil responsibly and follow the oil specification listed in your owner’s manual. Using the correct oil ensures proper lubrication and helps protect your engine over the long term.
2. Engine Air Filter Replacement
Your engine air filter prevents dust, dirt, and debris from entering the engine. A clean filter allows proper airflow, which helps maintain engine performance and fuel efficiency. When the filter becomes clogged, the engine may feel less responsive and fuel consumption can increase.
Typical interval:
Around 15,000–30,000 km, though vehicles driven on dusty roads may need replacement sooner.
How to replace it:
- Locate the air filter housing (usually a plastic box near the engine intake).
- Release the clips or screws holding the airbox lid.
- Remove the old filter and inspect it for dirt or blockage.
- Insert the new air filter, ensuring it sits correctly in the housing.
- Close the airbox and secure the clips or screws.
The entire process typically takes only a few minutes and requires minimal tools.
3. Cabin Air Filter Replacement
The cabin air filter keeps dust, pollen, and road pollution out of your vehicle’s interior while helping the air conditioning system maintain proper airflow.
Typical interval:
Around 15,000–25,000 km, depending on driving conditions.
How to replace it:
- Locate the cabin filter housing, usually behind the glove box or under the dashboard.
- Open the access panel or release the retaining clips.
- Slide out the old filter and check the airflow direction marked on it.
- Insert the new filter in the same orientation.
- Close the housing and reinstall the glove box if required.
4. Checking and Topping Up Fluids
A basic DIY service should always include checking your vehicle’s key fluids. These fluids help lubricate components, regulate temperature, and transfer hydraulic pressure. If levels drop too low, it can lead to overheating, poor braking performance, or unnecessary wear.
Start by opening the bonnet and locating the main fluid reservoirs. Most modern vehicles clearly mark fluid caps and reservoirs, making them easy to identify.
| Fluid | Where to Check | How to Check |
|---|---|---|
| Engine Oil | Dipstick near engine | Remove dipstick, wipe, reinsert, then check level |
| Coolant | Plastic reservoir near the radiator or side of the engine bay | Ensure fluid sits between MIN and MAX |
| Brake Fluid | Mounted on top of the brake master cylinder at the rear of the engine bay near the firewall | Check fluid level against markings |
| Power Steering Fluid | Near the front or side of the engine bay, close to the steering pump | Confirm level sits within recommended range |
| Washer Fluid | Washer fluid bottle | Open cap and visually check level |
Topping up fluids is usually simple. Engine oil is added through the oil filler cap, while coolant, brake fluid, and power steering fluid can be topped up directly through their reservoirs using the correct fluid type. Washer fluid can simply be poured into the washer bottle.
Checking fluid levels only takes a few minutes and helps prevent overheating, brake issues, and unnecessary mechanical wear.
5. Replacing Wiper Blades
Wiper blades wear out faster than many drivers realise.
Typical replacement interval: every 6–12 months.
To replace them, lift the wiper arm away from the windscreen, press the release tab on the old blade, and slide it off the wiper arm. Attach the new blade by sliding it into the hook until it clicks into place, then lower the arm carefully back onto the glass.
Signs they need replacing: streaking on the windscreen, squeaking or chattering noises, or missed spots during wiping.
Tools for Basic DIY Servicing
|
Safety Tips
|
The Real Savings of DIY Maintenance
The biggest advantage of DIY servicing is the long-term savings.
For example, if you perform two oil changes and replace filters yourself each year, you could easily save $300–$600 annually compared with workshop servicing.
Over several years of ownership, that adds up to a substantial amount while keeping your vehicle properly maintained.
Find Quality Parts at Superspares
DIY servicing becomes much easier when you have access to the right parts and fluids.
Superspares makes it simple to find service essentials like engine oil, filters, wiper blades, and more car maintenance components for passenger cars, performance vehicles, and 4WDs. As a trusted Australian automotive parts store, we stock reliable brands and parts matched to your vehicle.
With the right parts and a bit of time in the garage, maintaining your car yourself can be both rewarding and cost-effective.

Written by Toby Martin
Automotive Content Specialist
FAQs
Is it legal to service your own car in Australia? +
Yes. You can service your own vehicle as long as the work is done correctly and the parts used meet manufacturer specifications. For newer vehicles under warranty, it’s important to keep records and receipts of parts and fluids used.
How much money can DIY car servicing save? +
It depends on how many tasks you do yourself. Even basic jobs like oil changes, filters, and wiper blades can save $300–$600 per year compared with workshop labour costs.
What car maintenance tasks are easiest to do yourself? +
- Engine oil and filter changes
- Engine air filter replacement
- Cabin air filter replacement
- Checking and topping up fluids
- Replacing wiper blades
What tools do I need for basic DIY car servicing? +
Most routine maintenance only requires a socket set, screwdrivers, oil drain pan, funnel, jack and jack stands, gloves, and rags. A basic toolkit is usually enough for common servicing tasks.
How often should I service my car at home? +
Basic checks such as fluid levels and tyre condition should be done every few months. Oil changes and filter replacements usually follow manufacturer intervals, typically every 5,000–15,000 km depending on the vehicle and oil type.
When should you avoid DIY servicing? +
Some jobs are better left to professionals, especially brake system repairs, suspension work, timing belt replacement, or complex engine repairs. These systems affect vehicle safety and often require specialised tools.
Will DIY servicing affect my car warranty? +
It usually won’t, provided you follow the manufacturer’s service schedule, use approved parts and fluids, and keep documentation showing the service was performed correctly.

